
This crochet brimmed cap will be perfect for spring and summer.

Materials: DROPS LIN from Garnstudio
100-100-100 g colour no 103, linen
DROPS CROCHET HOOK SIZE 3 mm – or size needed to get 22 dc = width 10 cm.
DROPS WOODEN BUTTON NO 501: 1 piece
INCREASE TIP: Inc 1 dc by working 2 dc in same st.
DECREASE TIP: Dec 1 dc by working 1 dc but wait with last YO and last pull through (= 2 sts on hook), then work next dc but on last YO and pull through pull thread through all sts on hook = 1 dc dec.
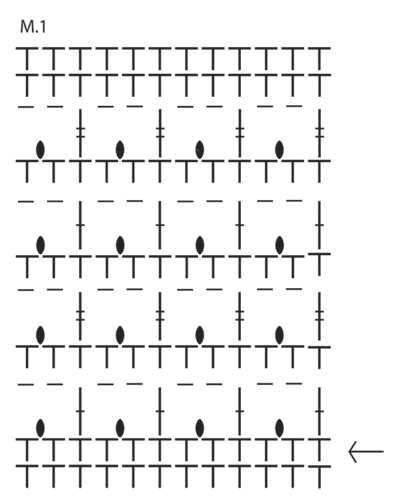
PATTERN: See diagram M.1, start of round is marked with arrow in diagram - NOTE: In M.1 replace first dc on round with dc with 1 ch and finish round with 1 sl st in ch from beg of round. Replace first tr at beg of every round with tr with 3 ch and finish every round with 1 sl st in 3rd ch from beg of round. Replace first dtr at beg of every round with dtr with 4 ch and finish every round with 1 sl st in 4th ch from beg of round.
--------------------------------------------------------
HAT:
The piece is worked top down.
Crochet 5 ch on hook size 3 mm with 1 thread Lin and form a ring with 1 sl st in first ch.
ROUND 1: Work 12 dc in ch-ring – READ CROCHET INFO!
ROUND 2: * 1 dc in first st, 2 dc in next st *, repeat from *-* the rest of the round = 18 dc.
ROUND 3: * 1 dc in each of the first 2 sts, 2 dc in next st *, repeat from *-* the rest of the round = 24 dc.
ROUND 4: * 1 dc in each of the first 3 sts, 2 dc in next st *, repeat from *-* the rest of the round = 30 dc.
Continue inc like this (= inc 6 dc on every round) until there are 96-102-108 dc on the round (i.e. so that for every round 1 dc more is worked between every 1 dc inc). Continue working 1 dc in every st until piece measures 10-11-12 cm from mid down - while AT THE SAME TIME on last round inc 3-6-9 dc evenly - READ INCREASE TIP = 99-108-117. Now work PATTERN - see explanation above. After M.1 there are still 99-108-117 dc on the round and the piece measures approx. 16-17-18 cm from mid and down. Cut and fasten the thread, beg of round = mid back. Insert a marker mid front (in sizes S + L insert marker in the middle st and in size M insert marker between the middle 2 sts).
BRIM:
Beg from RS, 13-15-16 sts before marker mid front and work on hook size 3 mm with 2 threads Lin as follows: * 1 dc in each of the first 2 sts, 2 dc in next st *, repeat from *-* 9-10-11 times = 36-40-44 dc. Turn piece and work back with 1 dc in every dc. Continue to work dc back and forth while AT THE SAME TIME dec 1 dc in each side on every other row a total of 3 times - READ DECREASE TIP = 30-34-38 dc. Cut and fasten the threads, brim measures approx. 3 cm.
EDGE:
Work 1 edge on hook size 3 with 2 threads Lin as follows: 1 dc at beg of round (= mid back), * 1 ch, skip 1 dc, 1 dc in next st *, repeat from *-* around the entire edge of cap and brim, and finish 1 sl st in dc from beg of round.
BUTTON COVER:
Work a cover for 1 button on hook size 3 mm with 1 thread Lin as follows:
ROUND 1: Work 2 ch, then work 16 tr in the first of the 2 ch worked, finish with 1 sl st at top of first tr.
ROUND 2: Work 1 dc in every tr and finish with 1 sl st in first dc on round = 16 dc.
ROUND 3: Work 3 ch (= 1 tr), continue to work 1 tr in every other dc from previous round, finish with 1 sl st in 3rd ch from beg of round = 8 tr.
Place button inside the cover, sew around the edge and tighten tog.
Sew the button mid on top of cap.
This pattern from
http://www.garnstudio.com
Size: S - M - L
Head circumference: 54/56 - 56/58 - 58/60
cmMaterials: DROPS LIN from Garnstudio
100-100-100 g colour no 103, linen
DROPS CROCHET HOOK SIZE 3 mm – or size needed to get 22 dc = width 10 cm.
DROPS WOODEN BUTTON NO 501: 1 piece
NOTE: This pattern is written in British English. All measurements in charts are in cm. For conversion from cm to inch - click here. There are different terms for crocheting in British and American English. If this pattern includes crochet, click for "crochet terms" here. For this pattern in American English, please click here.
CROCHET
INFO: Replace first dc at beg of every round with dc with 1 ch and finish every
round with 1 sl st in ch from beg of round.
INCREASE TIP: Inc 1 dc by working 2 dc in same st.
DECREASE TIP: Dec 1 dc by working 1 dc but wait with last YO and last pull through (= 2 sts on hook), then work next dc but on last YO and pull through pull thread through all sts on hook = 1 dc dec.
PATTERN: See diagram M.1, start of round is marked with arrow in diagram - NOTE: In M.1 replace first dc on round with dc with 1 ch and finish round with 1 sl st in ch from beg of round. Replace first tr at beg of every round with tr with 3 ch and finish every round with 1 sl st in 3rd ch from beg of round. Replace first dtr at beg of every round with dtr with 4 ch and finish every round with 1 sl st in 4th ch from beg of round.
--------------------------------------------------------
HAT:
The piece is worked top down.
Crochet 5 ch on hook size 3 mm with 1 thread Lin and form a ring with 1 sl st in first ch.
ROUND 1: Work 12 dc in ch-ring – READ CROCHET INFO!
ROUND 2: * 1 dc in first st, 2 dc in next st *, repeat from *-* the rest of the round = 18 dc.
ROUND 3: * 1 dc in each of the first 2 sts, 2 dc in next st *, repeat from *-* the rest of the round = 24 dc.
ROUND 4: * 1 dc in each of the first 3 sts, 2 dc in next st *, repeat from *-* the rest of the round = 30 dc.
Continue inc like this (= inc 6 dc on every round) until there are 96-102-108 dc on the round (i.e. so that for every round 1 dc more is worked between every 1 dc inc). Continue working 1 dc in every st until piece measures 10-11-12 cm from mid down - while AT THE SAME TIME on last round inc 3-6-9 dc evenly - READ INCREASE TIP = 99-108-117. Now work PATTERN - see explanation above. After M.1 there are still 99-108-117 dc on the round and the piece measures approx. 16-17-18 cm from mid and down. Cut and fasten the thread, beg of round = mid back. Insert a marker mid front (in sizes S + L insert marker in the middle st and in size M insert marker between the middle 2 sts).
BRIM:
Beg from RS, 13-15-16 sts before marker mid front and work on hook size 3 mm with 2 threads Lin as follows: * 1 dc in each of the first 2 sts, 2 dc in next st *, repeat from *-* 9-10-11 times = 36-40-44 dc. Turn piece and work back with 1 dc in every dc. Continue to work dc back and forth while AT THE SAME TIME dec 1 dc in each side on every other row a total of 3 times - READ DECREASE TIP = 30-34-38 dc. Cut and fasten the threads, brim measures approx. 3 cm.
EDGE:
Work 1 edge on hook size 3 with 2 threads Lin as follows: 1 dc at beg of round (= mid back), * 1 ch, skip 1 dc, 1 dc in next st *, repeat from *-* around the entire edge of cap and brim, and finish 1 sl st in dc from beg of round.
BUTTON COVER:
Work a cover for 1 button on hook size 3 mm with 1 thread Lin as follows:
ROUND 1: Work 2 ch, then work 16 tr in the first of the 2 ch worked, finish with 1 sl st at top of first tr.
ROUND 2: Work 1 dc in every tr and finish with 1 sl st in first dc on round = 16 dc.
ROUND 3: Work 3 ch (= 1 tr), continue to work 1 tr in every other dc from previous round, finish with 1 sl st in 3rd ch from beg of round = 8 tr.
Place button inside the cover, sew around the edge and tighten tog.
Sew the button mid on top of cap.
Diagram
 |
= | 1 ch |
 |
= | 1 dc |
 |
= | 4 ch, 1 sl st in first ch (1 picot) |
 |
= | 1 tr |
 |
= | 1 dtr |
 |
= | beg here |
Diagram
| |
= | 1 ch |
| |
= | 1 dc |
| |
= | 4 ch, 1 sl st in first ch (1 picot) |
| |
= | 1 tr |
| |
= | 1 dtr |
| |
= | beg here |
This pattern from
http://www.garnstudio.com
Are you looking for easy to follow quality pattern with plenty step-by-step pictures??? Please visit my store on Etsy
https://www.etsy.com/shop/SunnyBunnyCrochet
https://www.etsy.com/shop/SunnyBunnyCrochet
No comments:
Post a Comment